SwiftUI 可以说是 WWDC 2019 中最让人激动的技术了,什么是 SwiftUI 呢?官方说法为:SwiftUI is a modern way to declare user interfaces for any Apple platform. Create beautiful, dynamic apps faster than ever before。
总之,这套新的 UI 框架用 WWDC Session 中的话描述就是:
The Shortest Path to a Great App
那下面我们就用 SwiftUI 实现一个 iOS 中最常见的列表页,看看到底 Modern、Faster 在哪里?
First Glance

1 | struct LandMarkView : View { |
同使用 UIKit 写一个列表页进行对比:
- 不需要实现 UITableViewDelegate 和 UITableViewDataSource,写一堆冗长的代码,在
List(items)中描述列表的数据,在 List 的 Closure 中描述每个 Cell - 不需要使用 AutoLayout 或 Frame 对元素进行排版,HStack(View Container)将元素包起来,简单清晰
- 当数据 landmarks 有变化时,不需要再调用 reloadData,包括 landmarks 个数有变化或 landmark.isFavorite 值变化,SwiftUI 都会自动更新界面
可以看到,SwiftUI 极大地简化了构建 UI 的过程(Faster),这种耳目一新的构建方式是 Declarative 声明式编程(Modern),而之前 UIKit 的方式是 Imperative 命令式编程,两者有什么区别呢?
Imperative vs Declarative
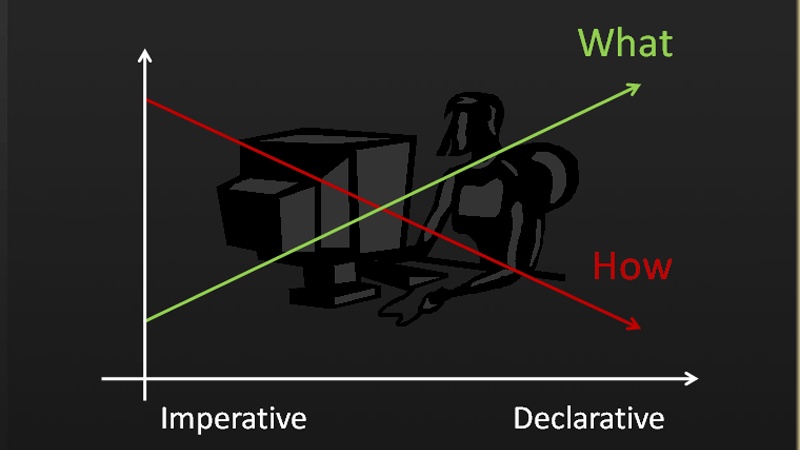
- Imperative:命令式,明确而详细的告诉机器做一些事情,从而达到你想要的结果,专注于 How。这种方式更贴近机器思维,CPU 就是一条条执行 PC 指向的机器码。
- Declarative:声明式,描述你想要什么,交由机器来来完成你想要的,专注于 What。这种方式更贴近人类思维,最开始都是先确定自己想要什么,才会一步步实现。
举个例子,如果我们要去旅游:
- 对于 Imperative,就是自由行,自己要安排详细的行程,包括购买机票,查询各种交通,预定酒店,预定游玩场所的门票,确定吃饭的餐厅等等。
- 对于 Declarative,就是跟团游,自己只需要表达想去哪里玩,旅行社或者代理商会帮你安排整个行程。
Declarative 的核心在于描述 What,将 How 委托给一个 Expert 来完成。如何描述 What,这里就涉及到了 DSL 领域描述语言。
在 SwiftUI 之前,我们其实或多或少接触过 Declarative,最典型的就是 SQL,SQL 语句就是一种 DSL,例如对于 SELECT * from product WHERE id = 996 这条语句,只是描述了我们想从 product 表中找到 id 为 996 的商品(What),至于怎么找(How),交给数据库来处理,数据库会高效、健壮的取到数据并返回给我们。
另外,AutoLayout 也可以看成一种简单的 Declarative。
Imperative 和 Declarative 两者各有优缺点,从目前的趋势来看,React/Flutter/SwiftUI 通过 Declarative 来构建 UI,看起来 Declarative 是未来 UI 编程的趋势。为什么大家都不约而同的选择 Declarative 呢?今年 WWDC 中 Apple 工程师给出了答案:


对于一个 App 而言,其代码分为两部分 Basic Features 和 Exciting/Custom Features,让 App 出彩、给用户带来很棒体验的是 Exciting/Custom Features,SwiftUI 的目的就是为了减少开发者在 Basic Features 部分的负担,让开发者更专注于 Exciting/Custom Features。
View
A view defines a piece of UI
上面也提到了,声明式相当于将具体的操作委托给一个 Engine,由 Engine 来做具体的脏活累活,向上提供一个抽象层。在 SwiftUI 中这个抽象层就是 View,SwiftUI 中的 View 不再是 UIKit 中的 UIView,没有 Backing Store,不涉及到真正的渲染,View 只是一个抽象概念,描述 UI 应该如何展示。我们看下 View 的定义:
1 | public protocol View : _View { |
可以看出,在 SwiftUI 中 View 只是一个 protocol,里面有一个 body 的属性,body 又是 View。这样就可以通过 body 将 View 串起来,形成 View Hierarchy。
Swift 5.1 Magic for SwiftUI DSL
为了实现 SwiftUI 的声明式编程,提供 DSL,Swift 语言在 5.1 中引入了一些新特性:(注:这一节的内容参考 SwiftUI 的一些初步探索 (一) - 小专栏 和 SwiftUI 的 DSL 语法分析 - 知乎 较多)
Opaque Return Types
1 | struct ContentView: View { |
上面一段自定义 View 的代码中 var body: some View 这行中多了一个 some,这个 some 是干吗用的?由于 View 只是 protocol,在 Swift 5.1 之前,带有 associatedtype 的协议是不能做为类型来用,只能作为类型约束:
1 | // Error |
相当于在声明 body 时,不能用 View,需要指定具体的类型,例如 VStack、Text 等,但如果 body 的类型变化,每次都需要修改,比较麻烦。因此 Swift 5.1 引入了 Opaque Return Types,使用方式是 some protocol,当 body 的类型变成 some View 后,相当于它向编译器作出保证,每次 body 得到的一定是某一个确定的、遵守View协议的类型,但是请编译器“网开一面”,不要再细究具体的类型。返回类型确定单一这个条件十分重要,写成下面的样子编译器会报错:
1 | // Error |
Property Delegates
1 | struct RoomDetail : View { |
在上面的代码中,一旦 zoomed 的值发生变化,SwiftUI 会自动更新 UI,这一切都源于 @State。State 本质上只是一个自定义类,用 @propertyDelegate 修饰,@State var zoomed 会将 zoomed 的读写转到 State 类中实现了。
1 | public struct State<Value> |
里面 @propertyDelegate 是 Swift 5.1 引入的新特性 Property Delegate,这个特性有什么用呢?假设我们有一个设置页面,需要在 UserDefault 中存储一些属性,
1 | struct Preferences { |
可以发现 shouldAlert 和 refreshRequency 代码重复较多,如果再多一些设置值,Preferences 这个类会写的烦死。针对这种情况,Swift 5.1 引入 Property Delegate,可以将 Property 的相同行为 Delegate 给一个代理对象去做:
1 |
|
当使用 @UserDefault(key: "shouldAlert", defaultValue: false) 修饰过 shouldAlert 之后,shouldAlert 会被编译器处理成下面的样子:
1 | struct Preferences { |
回到 @State,当 zoomed 被 @State 修饰后,zoomed 的读写被 Delegate 到 State 类中,SwiftUI 框架在 State 类中根据 zoomed 值的变化去触发界面的更新,达到 Value 变化 UI 自动更新的效果。
Trailing Closure & Function Builder
1 | HStack(alignment: .center) { |
HStack 中 View 与 View 之间没有 , 区分,也没有 return,这种 DSL 的写法主要基于 Swift 的 Trailing Closure 和 Function Builder。下面是 HStack 的定义:
1 | public struct HStack<Content> where Content : View { |
首先对于 Trailing Closure,如果一个 Swift 方法中最后一个参数是 Closure,则可以将 Closure 提到括号外面。
1 | public struct ViewBuilder { |
其次对于 Function Builder,可以看到 content 前面有一个 @ViewBuilder ,而 ViewBuilder 使用了 @_functionBuilder 修饰,被 @ViewBuilder 修饰过的 Closure 就会被修改语法树,转调 ViewBuilder 的 buildBlock 函数。最终
1 | HStack(alignment: .center) { |
被转换成了
1 | HStack(alignment: .center) { |
最后,Apple 为 SwiftUI 提供了一个无论是内容还是交互都非常棒的官方教程,值得学习 SwiftUI 时跟着教程动手练习,正如同今年 WWDC 的主题一样,一起 Write Code,Blow Minds 吧。